
WEDOS REST API is still in development. Access and features may change without notice.
This manual covers the basics of WEDOS REST API. For WEDOS API (WAPI) see WAPI – Manual.
In this article, you will learn:
- How WEDOS REST API works
- What are the available endpoints
- How to manage API clients
- How API request logging works
- Frequently asked questions
WEDOS REST API Features
HTTP REST API v2 lets you manage your WEDOS services from your own applications and scripts. All communication runs over HTTPS at https://api.wedos.com, and data is sent and returned as JSON.
To gain API access, you need to create an API client with access permissions (read and write, or read only – see the Client Management chapter) to one or multiple endpoints (see Endpoints). Every request is logged (see Request Logging).
Request limit
- The default limit is 1,000 requests per hour per API client. Each client has its own limit, shared across all APIs (
domains,wdns,wgp, …). - All requests count towards the limit, including rejected ones.
- The current limit is shown in the client list in the administration panel.
- If the limit isn’t enough, contact customer support via form ⧉. Include the desired limit and a reason why you want to set it. We can raise it individually for your account.
HTTP REST API vs. WAPI
WEDOS offers two APIs: the older WAPI and the newer HTTP REST API v2. You can compare them using the following table:
| WAPI | HTTP REST API v2 | |
|---|---|---|
| Authentication | One login and WAPI password for the whole account | A separate API client with its own token for each application or person |
| Access restrictions | A required list of IP addresses for the whole account | Permission scopes, “Read only”, IP addresses and token validity, set per client |
| Format | XML or JSON, a single endpoint, commands in the request body | REST (HTTP methods and URLs), JSON |
| Coverage | A wide range of commands for WEDOS services | domains, contacts, NSSETs, WEDOS DNS, WEDOS Global Protection |
| Log | One log for the whole account | A log that identifies the API client |
We recommend using:
- HTTP REST API v2 for new integrations when it covers the operations you need, and wherever you need to separate access for individual people or systems, limit them to read only, or trace who did what (audit, DORA).
- WAPI for operations that HTTP REST API v2 doesn’t offer yet.
If you want to switch from WAPI to WEDOS REST API, follow these steps:
- In the administration, create an API client with the required permission scopes for each application or system. See the Client Management chapter for guidance.
- Replace your WAPI command calls with the matching endpoints from the documentation of each API. See the Endpoints chapter.
- Operation result codes (for example
1000OK,3201domain is already registered) are the same as in WAPI, because HTTP REST API v2 performs the same operations. In addition, there are general REST layer codes (for example2000missing or invalid token,2012read-only client), described in the documentation of each API. - You can use both APIs side by side during the transition.
Endpoints
WEDOS REST API enables control automation of the following areas:
- Domains: The
/domains/endpoints handle domain registration, transfers and renewals. They are also able to send AUTH-IDs, set up DNS servers/NSSET and KEYSET for DNSSEC. Their permissions scope is domains. You can find more information in the REST API – Domains article. - Domain contacts: The
/contacts/endpoints create and manage domain contacts. Transfers are available for .cz domains. Their permissions scope is domains. You can find more information in the REST API – Domain Contacts article. - NSSETs: The
/nssets/endpoints create and manage CZ.NIC’s NSSET objects. Their permissions scope is domains. You can find more information in the REST API – NSSETs article. - DNS: The
/dns/endpoint creates and manages DNS domains, as well as individual records. This includes imports to primary DNS and AXFR for secondary DNS. Their permissions scope is dns. You can find more information in the REST API – DNS article. - WEDOS.protection: The
/wgp/endpoints create and manage WEDOS.protection services. Their permissions scope is wgp. You can find more information in the articles REST API – WGP Domains, REST API – WGP Services and REST API – WGP Members.
The /oauth2/ endpoint is also available to manage client tokens. You can find more information in the OAuth2 chapter.
Client Management
You set up API access in the customer administration panel, in the HTTP REST API section. Create a separate API client for each application, system or person. For each client you set:
- Permission scopes: Which APIs the client can access,
- Read only: The client can only view information (see below),
- IP address filtering: Allowed or blocked IP addresses the client can call the API from,
- Token validity: When the access token becomes valid and when it expires.
The client authenticates with an access token in the Authorization: Bearer <TOKEN> header. You can generate the token directly in the administration, or your application can request it itself using the client ID and client secret (see the OAuth2 chapter).
Creating a New Client
You can only create a new client in the customer administration panel. Follow these steps:
- Log into the customer administration panel.
- Navigate to the WEDOS REST API Interface (currently unavailable).
- Click the New Client button.
- Enter a Client name (a short name that identifies the client in the list) and pick one or more permission areas from the Select permissions menu. The available areas correspond to endpoints.
- Optionally, perform other settings:
- Check Read only access. The client can then only request information. Requests that add, update or delete items are blocked.
- Under Token validity, choose how long the token stays valid after it is issued: No expiration, 7 days, 30 days, 90 days, 1 year or Custom. The Valid from and Expiration fields show the resulting dates.
- Under Security restrictions, optionally enable IP address filtering and enter an allowed IP address. Click + Add another for more addresses, or × to remove one. When enabled, the API accepts requests only from the listed addresses.
After completing setup, confirm it using the Create client button.
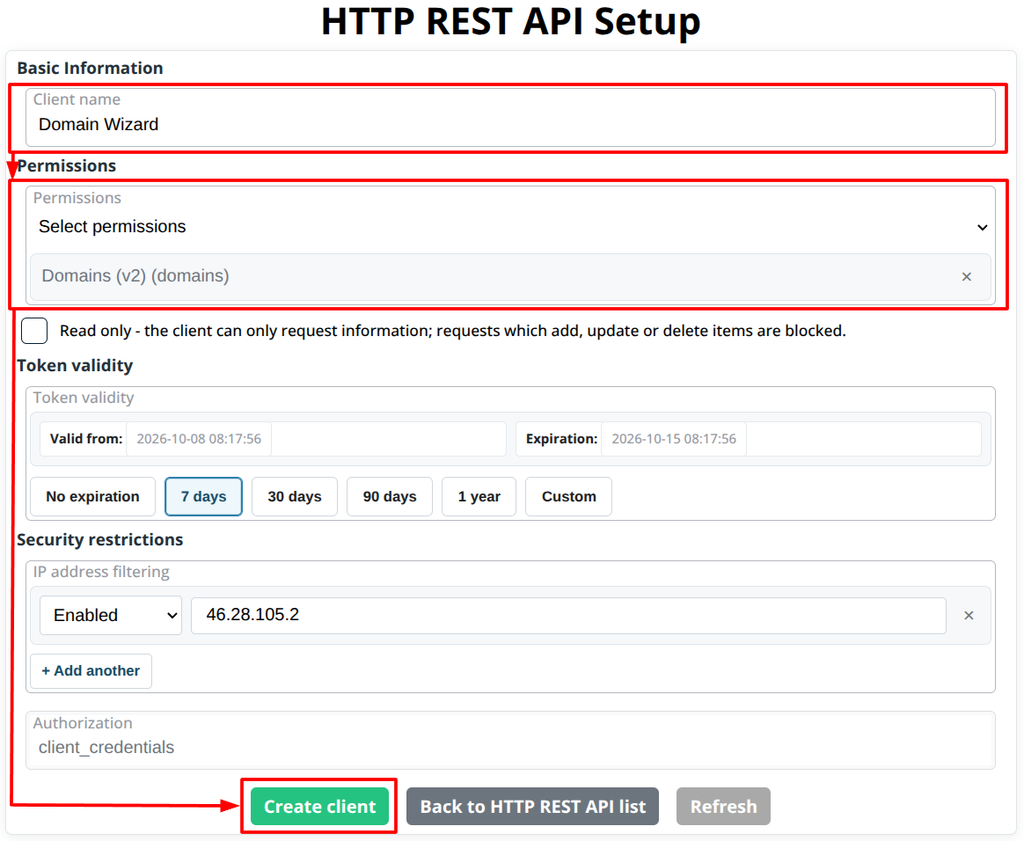
A client with the Read only option enabled can only call requests that view information (the GET method, plus select POST methods). Requests that add, change or delete anything are rejected by the API with code 2012, and the rejected request is recorded in the log. You can change this option at any time, and the change applies immediately, including to tokens that have already been issued.
The new client appears in the list with its name, permissions, access type (for example read, write), validity dates and status. You can filter the list by Permissions, Status, Validity and Access.
Client Secret
Right after you create a client, a Client secret key dialog appears with the message Copy the secret key and save it in a safe place.
- Click Copy next to the secret key.
- Store the secret somewhere safe, such as a password manager or your server’s secret store.
- Click I understand, close.
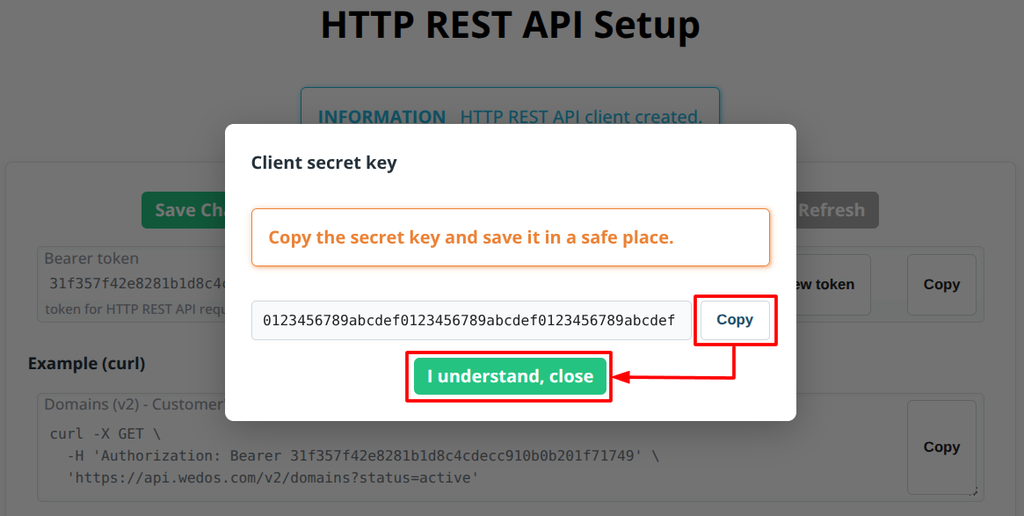
The secret is shown only in this dialog, so save it before you close it. You need it together with the client ID to request tokens via the API (see OAuth2).
Keep the secret confidential. Never commit it to public repositories, and never send it from a browser or mobile app. Use it only on the server side.
If you lose the secret, delete the current client and create a new one with the same settings and a new secret.
Managing an Existing Client
To open a client’s HTTP REST API Setup page, click the edit icon next to its name in the list. You can edit any settings entered during setup, including name and permissions.
You cannot edit Client ID and Client Secret.
While managing an existing client, the following controls are available:
- Save Changes: Save changes to the client’s settings.
- Disable: Deactivate (block) the client without deleting it.
- Delete: Remove the client permanently.
- Back to HTTP REST API list: Return to the client list.
- Refresh: Reload the page.
Client’s Bearer Token
The Bearer token is used to identify the Client during endpoint access. The field shows the client’s current access token. Click Copy to copy it.
To replace the token, click New token. The old token stops working immediately, so update every application that uses it.
The Example (curl) section shows a ready-to-use request with the current token for testing purposes.
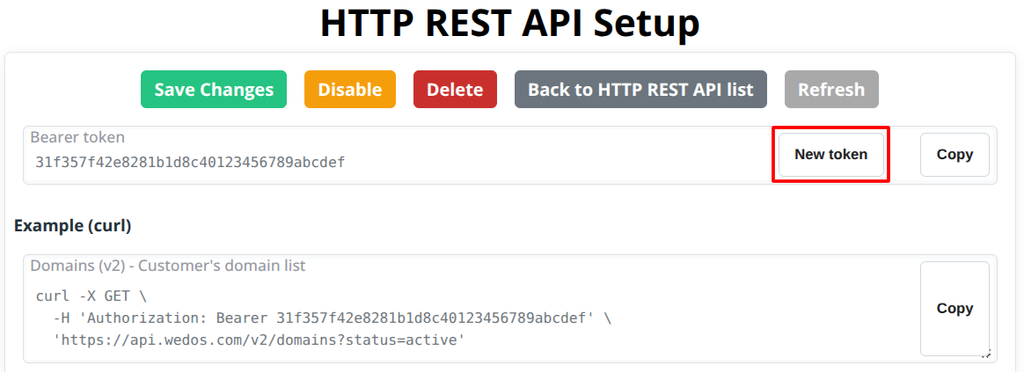
OAuth2
Your application can request its own token from POST https://api.wedos.com/oauth2/token using the client ID and Secret. Any other HTTP method returns an error.
- Client ID: In the client management interface, click Show Client ID to reveal the client ID, then click Copy.
- Client Secret: The secret is only available after account creation. See the Client Secret chapter for more information.
Use one of two methods:
- HTTP Basic (recommended): the header
Authorization: Basic <base64(client_id:client_secret)>. curl builds it for you with-u 'client_id:client_secret'. - In the request body: the parameters
client_idandclient_secret.
Send parameters in the body as application/x-www-form-urlencoded, or as JSON with the header Content-Type: application/json.
| Parameter | Required | Description |
|---|---|---|
grant_type | Yes | Always client_credentials |
scope | No | Space-separated permission scopes from among domains (includes domain contacts and NSSET), wdns and wgp. Must be a subset of the client’s scopes. If omitted, the token gets all of the client’s scopes. |
client_id, client_secret | Only without HTTP Basic | Client credentials |
Example: HTTP Basic (recommended)
curl -X POST -u '<CLIENT_ID>:<CLIENT_SECRET>' \
  -d 'grant_type=client_credentials' \
  -d 'scope=domains' \
  'https://api.wedos.com/oauth2/token'
Example: Credentials in the request body
curl -X POST \
  -d 'grant_type=client_credentials' \
  -d 'client_id=<CLIENT_ID>' \
  -d 'client_secret=<CLIENT_SECRET>' \
  -d 'scope=domains' \
  'https://api.wedos.com/oauth2/token'
Example: JSON
curl -X POST -H 'Content-Type: application/json' \
  -d '{"grant_type":"client_credentials","client_id":"<CLIENT_ID>","client_secret":"<CLIENT_SECRET>","scope":"domains"}' \
  'https://api.wedos.com/oauth2/token'
The code field is 1000 when the token was issued, or 2000 for a client authentication error or invalid request.
On success, data contains:
| Field | Description |
|---|---|
access_token | The token, sent as Authorization: Bearer <TOKEN> |
token_type | Token type (Bearer) |
expires_in | Validity in seconds (default 3600, i.e. 1 hour) |
scope | The scopes the token actually received |
{
  "code": 1000,
  "msg": "OK",
  "request_id": "a1b2c3d4",
  "data": {
    "access_token": "3f9c2e7a1b...",
    "expires_in": 3600,
    "token_type": "Bearer",
    "scope": "domains"
  }
}
No refresh token is issued for client_credentials. When the token expires, request a new one with the same call.
On error, data contains status_code (OAuth2 HTTP status, e.g. 400 or 401), error and error_description.
error | Cause |
|---|---|
invalid_client | Invalid client_id or client_secret, or the client is blocked |
invalid_request | grant_type or another required value is missing, or the method was not POST |
unsupported_grant_type | Unsupported grant_type value |
invalid_scope | The requested scope does not exist or is not assigned to the client |
{
  "code": 2000,
  "msg": "API method error - Bad Request",
  "request_id": "a1b2c3d5",
  "data": {
    "status_code": 400,
    "error": "invalid_client",
    "error_description": "The client credentials are invalid"
  }
}
Send the value of data.access_token in the Authorization header when you call any v2 endpoint covered by the token’s scope.
Example:
curl -X GET -H 'Authorization: Bearer <TOKEN>' \
  'https://api.wedos.com/v2/domains'
Strive to maintain the following best practices:
- Store the token and reuse it until it expires (
expires_in). Do not request a new token before every API call. - If a v2 endpoint returns an authentication error (
2000), request a new token and retry the call. - Request only the scopes your application needs, and use Read only for clients that never change data.
- Restrict each client to known IP addresses where possible.
- Create a separate client for each application, so you can disable or delete one without affecting the others.
Recommended setup for teams
For multiple people with API access, we recommend the following setup:
- One API client per person or system. The log shows who made each request, and when someone leaves, you block only their client.
- Only the scopes you need. A client for DNS doesn’t need access to domains.
- “Read only” wherever it’s enough – monitoring, reports, status checks.
- Restrict to IP addresses of the servers or networks that actually call the API.
- Token expiry. Set a validity period and renew the token regularly.
- Keep the client secret on the server side only – never in a browser, a mobile app or a public repository.
When someone leaves:
- Block or Delete their API client in the list of clients. All of its tokens stop working immediately, and no new token can be requested for it. Other clients are not affected.
- If someone else takes over their work, always create a new client for that person.
The New token button in the client detail generates a new token and invalidates the old one, but the client secret stays the same. Anyone who knows the secret can request a new token through the API. So when someone who knew the secret leaves, always block or delete the client.
Request Logging
The HTTP REST API section of the administration contains a request log. You can filter it by permission scope, API client, status and HTTP method.
To access the log, follow these steps:
- Log into the customer administration panel.
- Navigate to the WEDOS REST API Interface (currently unavailable).
- Click the View HTTP REST API Request Log button.
Each client in the list also has a log link that opens the log filtered to that client’s requests.
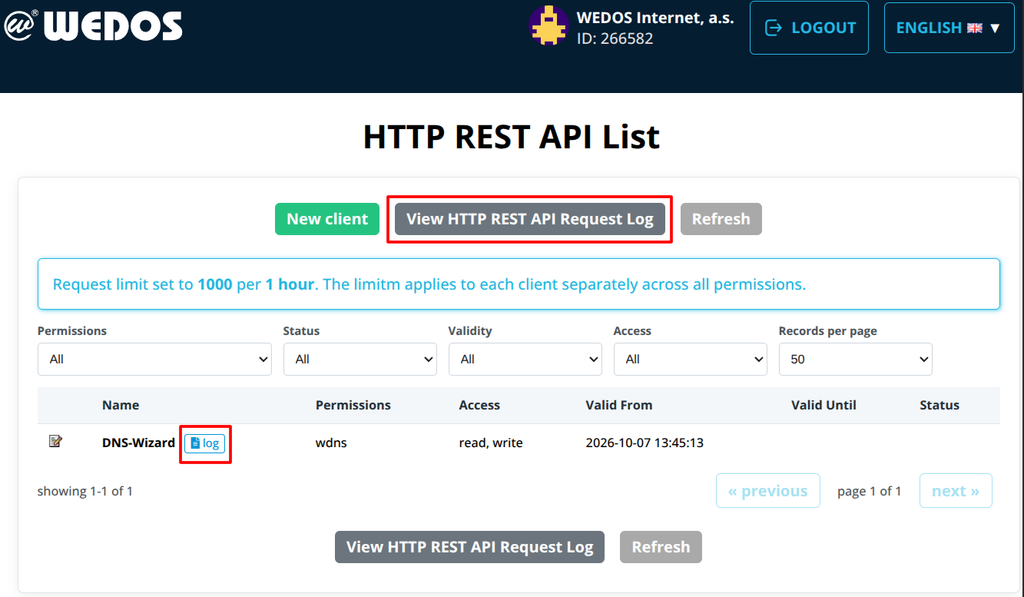
For each request, we record:
- date and time, and the IP address the request came from,
- the API client (ID and name) and permission scope,
- HTTP method, URL and the command that was run,
- input data and the API response (result and return code).
We do not record:
- the access token or the client secret – the
Authorizationheader is not stored in the request log, and the token is masked in WEDOS internal records, - sensitive values in the input data (passwords and similar) are stored masked.
Other important information:
- Input data and the response are stored together up to 1,024 characters. Anything longer is truncated.
- Records are kept for 90 days, after which they are deleted automatically.
- The log can’t be exported or read through the API yet. It’s available only in the customer administration panel.
Frequently Asked Questions
How do I test if the API works?
For each type of permission, you can find an Example (curl) block you can copy and test. This test typically lists that type of item available to manage in your user account.
Can I restirct a client only to specific domains or services?
A client can’t be restricted to specific domains or services yet. It has access to all services in your account within its permission scopes (by service types).
How do I use specific endpoints?
Make sure your client has the corresponding privileges. Then, follow the links in the Endpoints section.